Somewhere between the price and the purchase order, a drawing arrives: one page, rectangles standing in for machines, arrows showing which way the product travels. Buyers sign it because it looks like confirmation that the project is understood.
It is more useful than that. The drawing is the cheapest place to find a problem, because everything after it is steel, shipping and concrete. This page reads one from the buyer's side: what has to be on it, six checks worth running, what to send back. How much room a route needs is worked out in the fries line layout planning guide; this page asks whether the drawing is true.
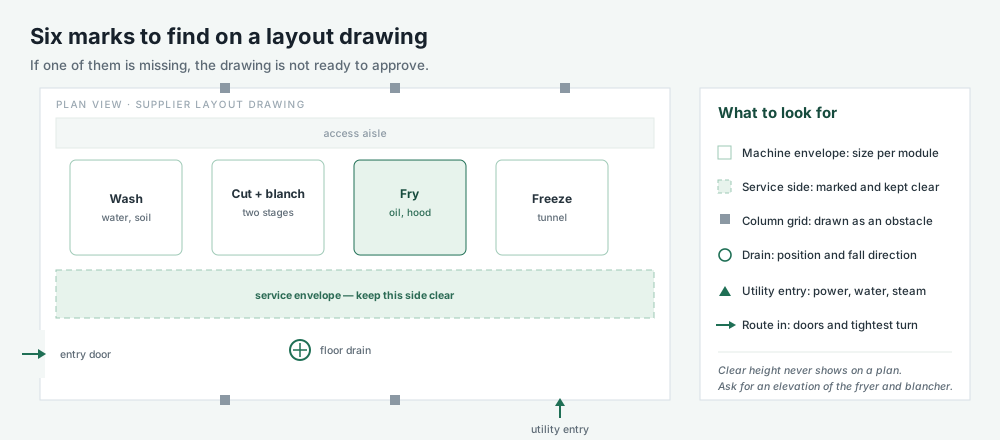
1. What the drawing is actually promising
A supplier's layout drawing is not a construction document. It states that the machines in the offer fit the building you described and that the sequence between them works — a testable claim, and tests need objects: dimensions, clearances, connection points, a route in.
So ask for the drawing revision number to sit in the offer, making a later change a conversation rather than a surprise — and keep the building information you sent next to it.
2. Six things that have to appear on the page
Weak drawings are usually incomplete rather than wrong. These six items separate one that can be approved from one that should go back with questions.
| Item | What to look for | Why it matters |
|---|---|---|
| Machine envelope | Length, width and height per module, not one outline for the line | Service access and door checks need real module sizes |
| Service side | A marked side for panels, cleaning and part removal | Decides aisles and operator positions |
| Clear height | Tallest point noted, including hoods and ducts | Hardest item to correct once the building stands |
| Columns and beams | Grid shown as obstacles, not left blank | Sets whether a straight run fits at all |
| Drains and utility entries | Positions marked, with the wet stages nearby | Water has to reach a drain by a short path |
| Installation route | Doors, corridors and turns from unloading to position | A line that fits but cannot be carried in is a risk |
3. Check one: measure the gaps, not the machines
Buyers add up machine lengths and compare the total with the room. What decides whether the line runs smoothly is the gap between modules — where product is transferred, sampled, cleaned and unjammed.
Walk the drawing from feeding end to packing end with a scale rule and note every gap too small for a person to work in. A drawing that closes the gaps to make the line fit is telling you the room is too small — useful information, arriving on time.
Where the gaps disappear first
Usually between the blancher and the fryer, and again before packing — places where a supplier assumes the buyer will manage. Ask for transfer points drawn individually rather than bridged by one arrow.
4. Check two: find the maintenance side
Every module has a side that must stay open: panels that swing, belts lifted out, oil drained, filters pulled. Draw it as a service envelope, not a comment in an email, and check it does not overlap the aisle or a wall.
The frying stage is where this is most often lost. Its working dimensions are published for the machine — see the continuous fryer working dimensions — while the clearance around it is a project item that belongs to your layout.
5. Check three: test whether the drawing was lifted from another project
Drawings get reused, and reuse is not dishonest. What matters is whether this one answers your building. Three quick tests expose a drawing that was never adjusted: columns do not match your plan, a drain sits on the wrong side of the wet stages, or the product exit faces a wall.
None of these needs engineering to spot — they need your building plan on the table next to the drawing, at the same scale.
6. When the drawing and the building disagree
They will disagree somewhere; the useful question is which side gives way. Three honest options, and they cost differently.
- Change the route: reorder or reorient stages, often into an L-shaped run that uses building width instead of length.
- Change the module: a shorter or narrower stage, accepting a different throughput or a different process detail.
- Change the building: a door widened, a slab opened, a beam raised — the option with the longest lead time and the least flexibility.
Decided before the order, this is a drawing change. Decided after arrival, it is a site works contract and the machines wait. The path from drawing to first saleable batch is set out in the installation readiness guide.
7. What to send back with the drawing
An approval that arrives without comments is treated as agreement. Put questions against the drawing itself, in the unit system agreed for the project, and send your own measurements at the same time. Five items make the next revision useful:
- Clear height measured at three points along the route, not one.
- Column spacing and any beam that crosses the route.
- Door and corridor widths on the way in, plus the tightest turn.
- Drain positions and the direction the floor falls.
- Where power, water and any steam or fuel connection enter the building.
These are the inputs the RFQ checklist asks for, because they change the offer as well as the drawing. The equipment selection guide shows how one stage constrains the next; the complete fries and chips line configurations show the full route drawn.
8. Frequently asked questions
Is a 2D plan enough to approve a fries line?
Usually yes for the arrangement, if it shows machine envelopes, service sides, clear height, columns, drains and utility entries. It cannot show how ducts and hoods stack, so ask for an elevation for the frying and blanching stages before treating the plan as final.
Who checks the building against the drawing?
You do, or someone you hire — the building is yours, and a supplier can only review what you send. If nobody measures clear height, columns, doors and drains, the drawing is a proposal rather than a plan.
What if the project uses different units from the drawing?
Agree one unit system in writing before the first drawing, keep it through every revision, and print it on the drawing. Mixed millimetres and inches is a common source of error at door openings and clear height, where one wrong unit turns a workable route into a rebuild.